
Session 3: GUI
Session 1 | Session 2 | Session 3 | Session 4
To get the full benefit of these matlab introduction sessions, try each example in MATLAB.
Also, have you completed Sessions 1 and 2? If not, go back to them first.
Matlab's HTML based help - Help Desk - is an invaluable source of information on both functions from
the matlab core as well as the GUI programming system Handle Graphics. Each time you come across a new
function, look it up in the HTML help. Help Desk can be accessed from the Help menu of the Matlab application.
Introduction
This session is about how to make MATLAB-based Graphical User Interface (GUI) tools.
The Big Picture
The user interface you create is a
- single entity with a
- certain personality to help a
- specific user perform a
- specific task.
- Do the users always know where they are?
- Do they always know where to go next?
- How long does it take to perform a task the first time?
- How long does it take to perform a task once the interface is familiar?
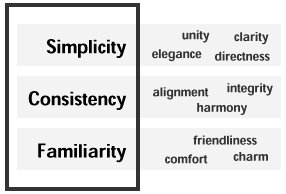
Simplicity
Simplicity in design is our chief goal. A simple GUI has a clean look and
a sense of unity. It’s very easy to add functionality to the GUI you’re
building, but if that functionality really doesn’t belong, take it out. Avoid
screen clutter, and only present users with choices that advance them
toward the completion of the task.
- Emphasize form, not number
- Minimize the area of interaction
- Use graphical input rather than numeric
- Use the familiar to draw users into the GUI
The Dynamic Interface
Much of what we’ve discussed so far is biased by the static world of
graphic design. But the world mediated by the computer is a dynamic
one, and there are a few more key words to mention. Where you act using
the GUI, your actions should be: Immediate, Continuous, and Reversible.
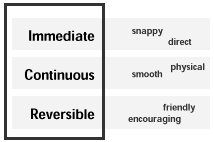
- Permit direct manipulation
- Keep it simple
Design Process
- Don’t start coding until you’re done designing
- Start with the ideal
- Test the GUI on paper
A Complete Example
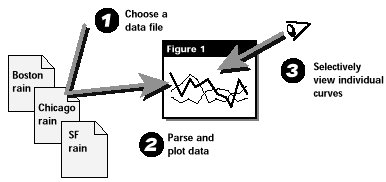


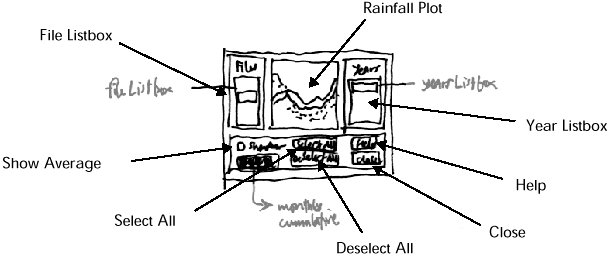
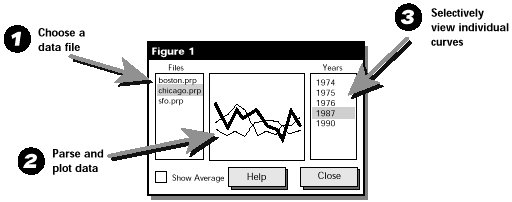
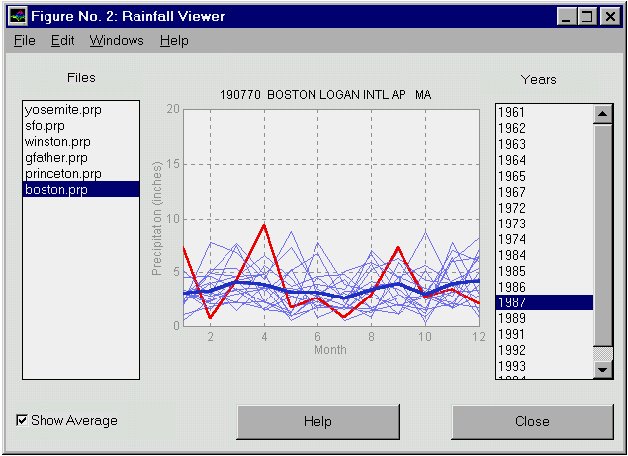
This is the GUI that represents the final implementation of the design.
Implementing the GUI
There are nine different kinds of uicontrols that can be added:
- Push buttons
- Radio buttons
- Checkboxes
- UI editable text
- UI static text
- Sliders
- Frames
- Listboxes
- Pop-up menus
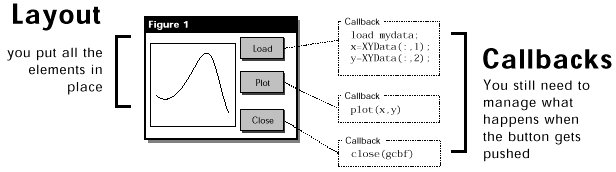
- Function callbacks are faster: Callbacks that consist of long strings to evaluate execute more slowly than callbacks that are short function names.
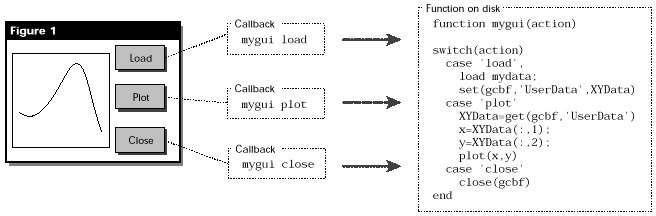
- Switchyard programming prevents function proliferation: Send all the
callbacks of your GUI to one single function with a
switchstatement so there won’t be a separate function for every callback.
- Use
gcboandgcbffor self-referential callbacks: usehelpto find out about these functions - Stateless programming with
findobjIf you use the findobj function to locate an object whenever you need to modify it, you can often eliminate the need for redundant state variables. Use on-line help to find out more. - Avoid potential errors by disabling Uicontrols: investigate the
Enableproperty in Matlab's Handle Graphics using the web based Help Desk - Use subfunctions inside the switchyard callback: Another good way to keep the callback function clean is to route common functionality into a subfunction in the same file.
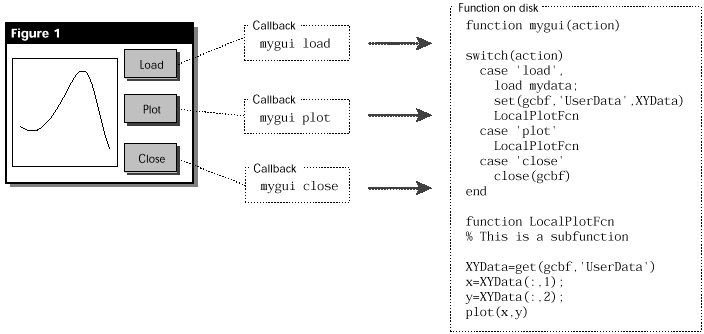
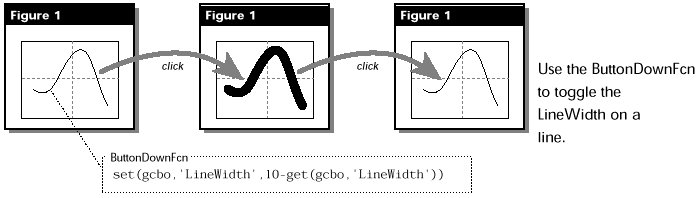
- Don’t forget about the
ButtonDownFcnEverything from a line to a figure has aButtonDownFcn. Use these and other special callback functions to give your GUI more leverage. Making appropriateButtonDownFcns for lines, text, and axes in your GUI is one of the most powerful ways to make it interactive. It also alleviates the need for lots and lots of uicontrols.
And finally...
Animate with WindowButtonMotionFcn: To animate a response as the mouse
is being dragged, use a combination of the callback functions
WindowButtonDownFcn, WindowButtonMotionFcn, and WindowButtonUpFcn.
One of the niftier things to do with a MATLAB GUI is animate a calculation on
the fly. To do this, you need a function that gets called while the mouse is
moving across the screen. This gets a little tricky, but the diagram below
explains the situation. Let’s say we want to click, drag, and release a dot on a
figure window. When we click down on the dot (a line with a single point, to be
specific), we need to pick up the coordinates of the mouse and set the position
of the dot accordingly.
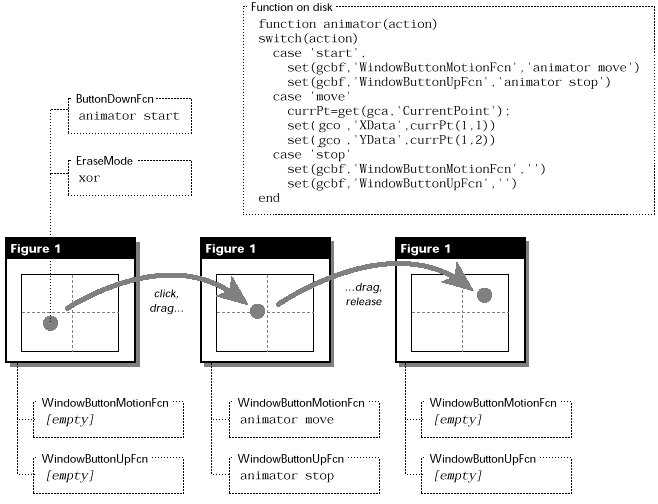
We can do exactly this with the figure property WindowButtonMotionFcn. But
the motion function can only be active when the mouse button is down.
To get a feel for real life GUI implementation, take look at the MAD package. Make sure you are familiar with all the points covered above: session 4 will consist of creating your own GUI to perform a simple sound related task.
Session 1 | Session 2 | Session 3 | Session 4