|

|
JWalk software testing tool suiteLazy systematic unit testing for agile methods |

|
The JWalkTester User Guide
The flagship testing tool in the JWalk 1.1 Tool Suite is the GUI-based unit testing tool JWalkTester. This is the default tool that is launched when the JAR-file download bundle is executed directly. Please note that you must first have a valid license to run this tool, which is obtainable free for most academic and industrial evaluation purposes. For this and the software bundle, please follow the clear instructions given at the JWalk Download Centre.Launching JWalkTesterThe following assumes that you have chosen your JWalk working directory, and have installed the software bundle: JWalk11.jar and an accompanying license: JWalkLicense.txt in this directory. Launching the Download BundleOn many platforms, you may launch the compressed JAR-file download bundle directly, by double-clicking on the icon. After the license is recognised, the main frame for the tool should appear centrally on your screen. Warning: if you do not have a valid license, the program will terminate immediately and silently! On some platforms, you may need to launch the download bundle from a command console window. In this console, change to your chosen JWalk working directory and launch the JAR-file download bundle using the Java command: java -jar JWalk11.jarAfter the license is recognised, the main frame for the tool should appear centrally on your screen. Warning: if you do not have a valid license, the program will terminate immediately and a license violation message will be printed on the console! Launching the Unbundled SoftwareRather than launch the compressed JAR-file download bundle directly, you may choose to unbundle the software archive first. Open a command console window and, in this console, change to your chosen JWalk working directory, in which the software bundle was placed. Unpack the archive using the command: jar -xf JWalk11.jarThis will create a Java package directory structure under your working directory. You may now launch the JWalkTester tool using the Java command: java org.jwalk.tool.JWalkTesterThis will invoke the main() method of the class
JWalkTester in the sub-package
org.jwalk.tool.
After the license is recognised, the main frame for the tool should appear
centrally on your screen. Warning: if you do
not have a valid license, the program will terminate immediately and a
license violation message will be printed on the console!

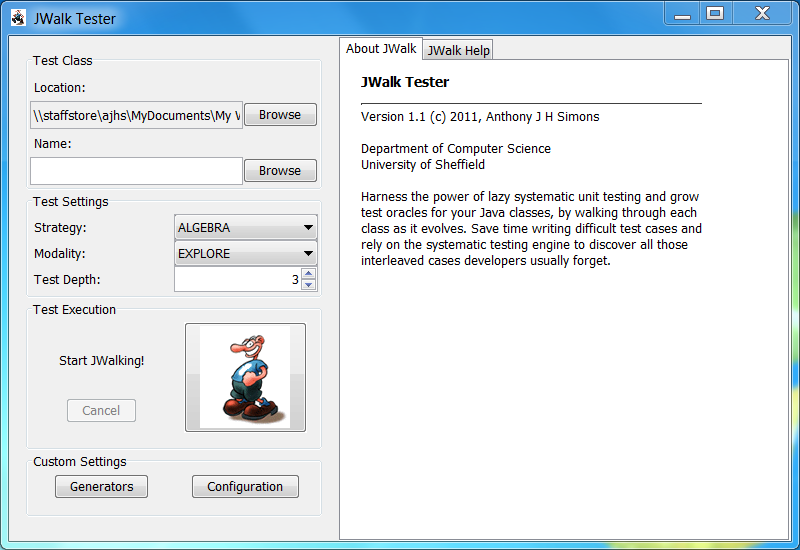
Standard InterfaceThe most comonly used functions available through the standard interface are described here. For more details on altering the configuration of the JWalkTester tool, please refer to the Custom Interface section of this guide. For advice on how best to conduct testing using the JWalkTester tool, please refer to the main User Guide section of this website. Test Class PanelThe tester must supply a test class. The tool gives you the choice of browsing for a class, or entering the name of the class directly. Since it is likely that classes will be contained in named packages, the test class is selected in two stages. Firstly, the tester must select the location from which to load the test class, using the upper Browse-button. This directory, also known as the test class directory, will appear in the upper text field. Secondly, the tester must select the test class from within its package, using the lower Browse-button. The package-qualified name of the class will appear in the lower text field. The correct package-qualified name of the class must always be used, otherwise the tool will either not be able to find it, or will not recognise its name when loading it. If the test class is not in any package (and belongs to the default Java package), then it may be selected in one step, using either Browse-button; and the tool will sort out the rest. A test class may be specified by typing its package-qualified name directly into the lower text field. Any named packages must either be listed on the standard Java CLASSPATH, or exist under the current working location. Test Settings PanelThe tester may then supply test settings for the current test series. These control how the tool executes. The standard settings may be chosen from combo boxes and a number spinner. Please refer to the main User Guide section for an explanation of what these settings mean.

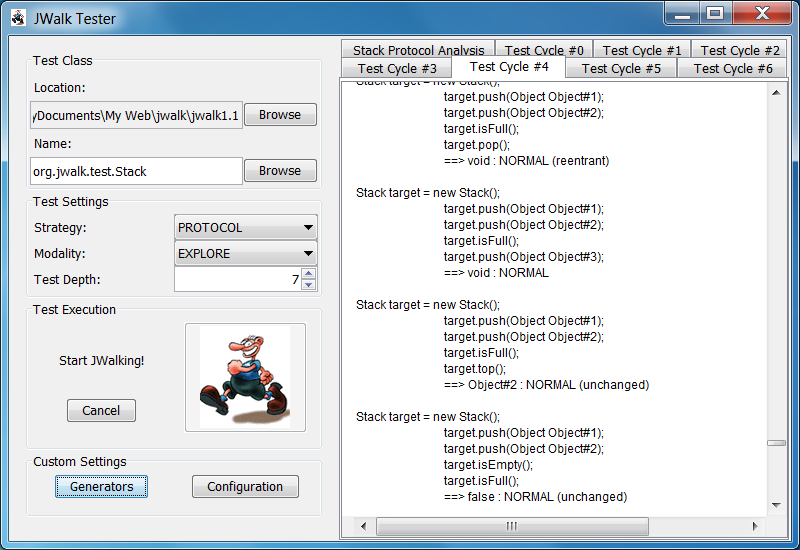
Test Execution PanelTo execute the chosen test series, click on the button featuring the iconic JWalking Jimbo cartoon character. Initially, Jimbo is in a standing posture, indicating that the tool is idle. Moving the mouse cursor over Jimbo will cause him to get ready to run. Clicking on the button will activate the JWalking animation, indicating that the test engine is executing in the background. When testing is completed, Jimbo reverts to his standing posture. During test execution, a Cancel button is enabled, to allow the user to interrupt the test series prematurely, if desired. Clicking on the test button causes the current test class and test settings to be uploaded to the core JWalker test engine. The first time the tool is used, there may be a slight delay as Java loads the relevant code into the runtime. Subsequent re-testing will be quicker. In the algebraic and state-space testing strategies, the tool will also perform an initial dynamic analysis of the test class, by executing probing sequences. This may add a further noticeable delay to the perceived response time, but may be mitigated by reducing the depth of probing in the custom settings. If ever the animation starts to slow down, this indicates that the tool is beginning to run out of memory. If the animation freezes completely, there will be a short delay, then the tool will recover from the out-of-memory condition, reporting this to the user via a dialog. The user may always click on the Cancel button to terminate execution before running out of memory. For very large testing challenges, you can relaunch the tool from the Java command line with a higher maximum Java heap size. For example: java -Xms64m -Xmx512m -jar JWalk11.jarwill reset the initial (minimum) heap size to 64 megabytes, and the maximum heap size to 512 megabyes (instead of the default 32 and 128 megabytes, respectively). Note that very large test sets will take possibly many minutes to complete. 
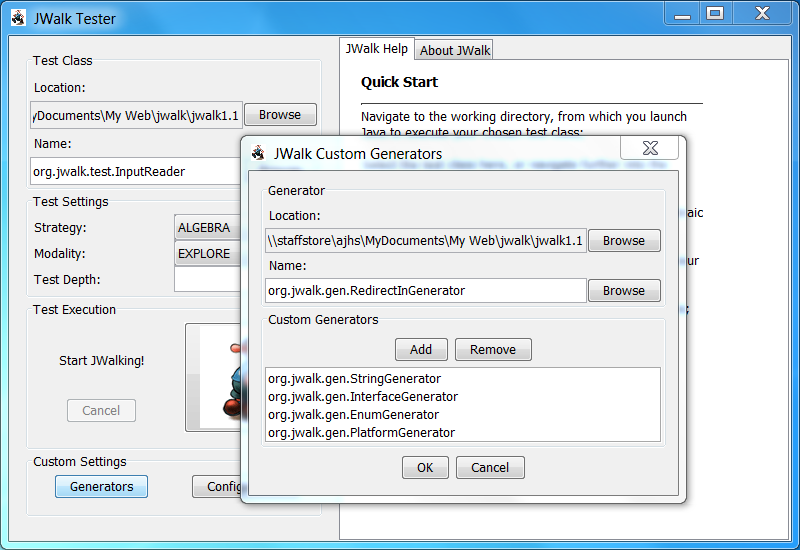
Custom InterfaceSometimes the tester will want to customise the behaviour of the JWalkTester tool, to adapt it to the needs of a particular test class. Various ways of doing this are accessed through the Custom Settings panel, described below. For advice on when you might need to customise the tool, please refer to the main User Guide section of this website. For specific advice on when you should construct your own CustomGenerators, please refer to the section on how to create Custom Generators for JWalk. Custom Generator DialogThis is launched by clicking the Generators-button on the Custom Settings panel. The tester may upload any number of CustomGenerators, which are compiled Java classes implementing the CustomGenerator interface. Uploading and adding is done in three steps (two are similar to loading the test class):
The lower panel allows the tester to add or remove CustomGenerators from the current set. Clicking on any custom generator in the current working set makes this the selected generator in the upper panel. Clicking the Add button adds the currently selected generator to the working set. Clicking the Remove button removes the currently selected generator from the working set. The modifications are uploaded to the core JWalker test engine when the tester clicks the OK-button. Clicking the Cancel-button will exit the dialog without making any changes. Custom Settings DialogThis is launched by clicking the Configuration-button on the Custom Settings panel. Here, the tester may modify a number of additional settings which rarely need changing. These may be chosen using a combo-box and a couple of number spinners. Please refer to the main User Guide section for an explanation of what these settings mean.
Output InterfaceThe JWalkTester tool produces various kinds of output, including test results and also a number of other dialogs. The most important of these is the dialog through which the tester confirms, or rejects particular test outcomes, when training a test oracle. For advice on how best to construct a test oracle, please refer to the main User Guide section of this website. Output PanelThe test results will appear as tabbed panes in the right hand output panel. Different tabs may appear for different test strategies, modalities and depths. The tabs stack in rows. Clicking on any tab will bring the contents of the tab to the front, and also bring its row of tabs to the front row. The tabs contain the following information:
org.jwalk.out. When the tool
is first launched, or the test class is changed, the output panel
may also display tabs giving information about the current version of the tool, or a quick start help guide.
Other DialogsDuring execution, the tool will sometimes interact with the tester in various ways. The main dialogs are:
|